


This is a short hands-on introduction to docker. There is nothing about Docker theory, it’s a practise tutorial. If you want to know what docker is, check this link out. The official Docker tutorial is a good startiing point as well, this is a single page alternative to it.
Tested Configuration:
MacOS: Sierra 10.12
Docker: 18.06 CE
Docker-compose: 1.21.1
1. Download docker
For macOs users, follow the instrucitons on this link to docker (Please Google the link for windows, and Linux versions)
Now check that is is working
Launch the Docker app and wait until it says “Docker is running”
Then type
docker --version
and make sure you have something like Docker version 18.06.1-ce, build e68fc7a
2. Docker in command line
We will now run our first Docker. Type :
docker run hello-world
It will say :
Unable to find image 'hello-world:latest' locally
because to run the hello-world Docker application, Docker needs the hello-world image. For more information about the Docker images click here
That is why Docker will download the latest hello-world image available on the Docker server (the company Docker hosts many Docker images for free on their “Docker hub”)
Pulling from library/hello-world
Then you will see:
Hello from Docker!
You made it !
3. Docker in command line, part 2
Same exercice as before, except this time we change the image. We no longer want the hello-world image, but the python:3.2 image. This python:3.2 image is basically Linux + python (version 3.2) installed on it.
docker run python:3.2 python --version
Also, note the end of the command : python --version
It represent the command we want to execute after the Docker is ready.
After some time, the terminal will display
3.2
Because instead of printing “Hello from Docker” (which was the purpose of the hello-world image), we asked Docker to print the python version of the image being run.
Note: When we run a Docker image, it is called a container. It basically represents the instanciation of the image.
4. Dockerfile
First, a Dockerfile is a file. While you could run every command from any folder before, from now on you need to be in a specific folder where lays the Dockerfile. In order to create a specific folder, and our first Dockerfile, please type :
mkdir docker_folder
cd docker_folder
touch Dockerfile
A Dockerfile is a simple way to describe the image you want to create, without having to write all in the command line. You basically say from what image you want to start, and then you describe the modification you want to add on top of the image you start from. Each modification is called a layer.
Dockerfile : create the image
You are still in the docker_folder, type
sudo nano Dockerfile
It will open your Dockerfile. Now copy the following code in your Dockerfile :
FROM python:latest

RUN python --version
Next step, we will tell Docker to create an image based on our Dockerfile. We name our image myFirstDockerImage. In a similar way, Docker used the tag hello-world for the image we used in Part 2
docker build --tag myfirstdockerimage .
That’s it. You created your first image using a Dockerfile ! Congrats
Dockerfile : run the image
This will be very similar to part 2, you only have to type :
docker run myfirstdockerimage
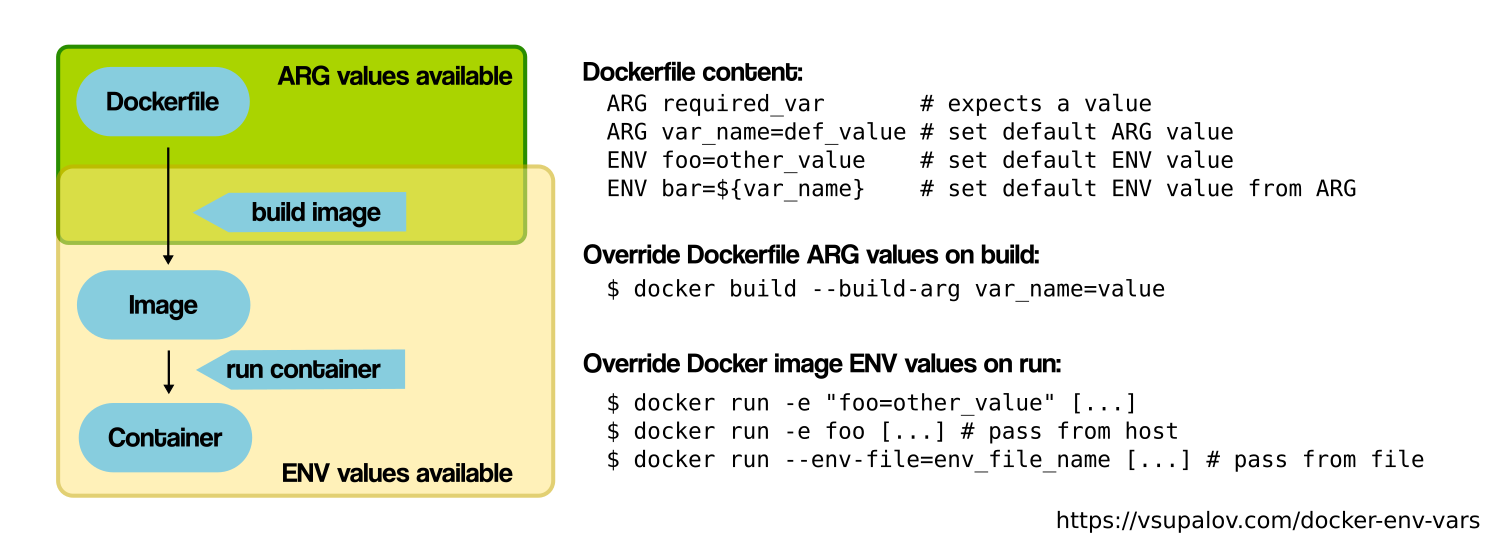
5. Dockerfile variables
Let’s say you want to use variable from the environment, and specify a specific variable for you docker container. This is how you do it:
In your Dockerfile
FROM python:latest

ARG envVar
ENV inheritedFromEnvironmentVariable=${envVar}
ENV simpleEnvironmentVariable=100

RUN python --version
Build your image
docker build --build-arg envVar=37 --tag myseconddockerimage .
That’s it. Now you have an image with environment variables pre-defined. we will see in the next part how to make sure these env var are accessible from a running container.
What if I want to customise envVar with something different than 37 ?
Let’s say you have defined in your shell environment a variable called myVar:
myVar="a random string"
Then you can access it using $myVar in your shell and forward it to your container
docker build --build-arg envVar=$myVar --tag myseconddockerimage .
I don’t understand the difference between ENV and ARG
- ARG : defines a variable that users can pass at build-time to the builder with the docker build command using the –build-arg
= flag - ENV : sets the environment variable
to the value --> ENV will persist when the container is run - combine both (what we did above):
ARG var
ENV var=${var}
I want to see my ARG during the build
You can write in your Dockerfile :
RUN echo ${envVar}
And you will see it appear while building the image
Summary
6. Interact with a running container
run -it
You can simply run your previous built image using -it or --interactive --tty and it will make your container interactive
docker run -it myseconddockerimage
Now you are in the container and you can interact with it using python. So let’s check python version again:
import sys
print(sys.version)
And it should respond the same as when Docker builds your image using the Dockerfile.
Note: tty is for teletype (reference to the old terminals direct interaction with kernels back in the days)
exec -it
First let’s simply run the container, allowing the container to run in the background (detach mode)
docker run -d myseconddockerimage
You can see it running using docker ps
Let’s open another terminal, and connect to the same running container using
docker exec -it CONTAINER_NAME python
You need to replace CONTAINERNAME by the name of the container. You will find the name of the container by typing docker ps in any terminal, and looking at the column _NAMES.
The rest is the same
Stop a running container: simply type docker container stop CONTAINER_NAME (if it doesn’t work try to kill it instead of stop)
7. Logs
You may want to see what is happening inside your running container. Easy :
docker logs CONTAINER_NAME
8. Debug
You may need to dig into an image or a container :
#inspect a container
docker inspect CONTAINER_NAME

#inspect an image
docker inspect myseconddockerimage
9. CPU usage…
You may want to know more about your running container. One command :
docker stats
10. Data
How to have persistent data ? Volumes
You can create a bi-directional link between a folder on your machine and a folder inside the container.
Meaning ?
Everything inside this folder will be accessible by the container, and if your container wants to delete some files from this folder, they will diseappear for real: in your machine as well.
Define a volume
Modify your Dockerfile :
FROM python:latest

RUN mkdir /src
VOLUME /src

RUN python --version
and build this new image
docker build --tag mythirddockerimage .
Then run a new container :
docker run -v $PWD:/src mythirddockerimage
Your current folder is now linked inside the container to the foler /src which means that if you create a file using
docker exec -it CONTAINER_NAME bash
touch newFile
You will see it on your real machine as well !
11. Important folder and files
Containers will have these folders :
/dev (devices) none by default. You’ll have to use the –privileged option to gain access -> for security reason, better keep the default conf. But the option –device can bring one specific device access if really necessary
/proc (processes)
/sys virtual file system
And files :
/etc/resolv.conf with DNS configuration of the container
/etc/hostname container name
/etc/hosts IP adress of the container + loopback adresses defintion
Random notes
- dockerd = deamon that receives all the commands. Therefore it has all root access to be able to launch other processes.
- Locally, Docker images are stored in this directory (link for more info):
Linux
var/lib/docker
MacOs:~/Library/Containers/com.docker.docker/Data/com.docker.driver.amd64-linux/Docker.qcow2
But the best way to save space is usingdocker prune